Trimming Black Beagle Nails You Cannot See Through
The distinct challenge of trimming black beagle nails is a hurdle many owners face with a mix of dread and trepidation. Unlike their light-nailed counterparts where the pink quick is easily visible, those dark nails hide the sensitive blood vessel and nerve, making every snip a potential gamble. This guide is here to strip away the anxiety, offering practical, empathetic advice on how to confidently and safely trim your beloved Beagle's black nails, ensuring their paw health and your peace of mind.
Understanding the Anatomy of a Beagle's Black Nail
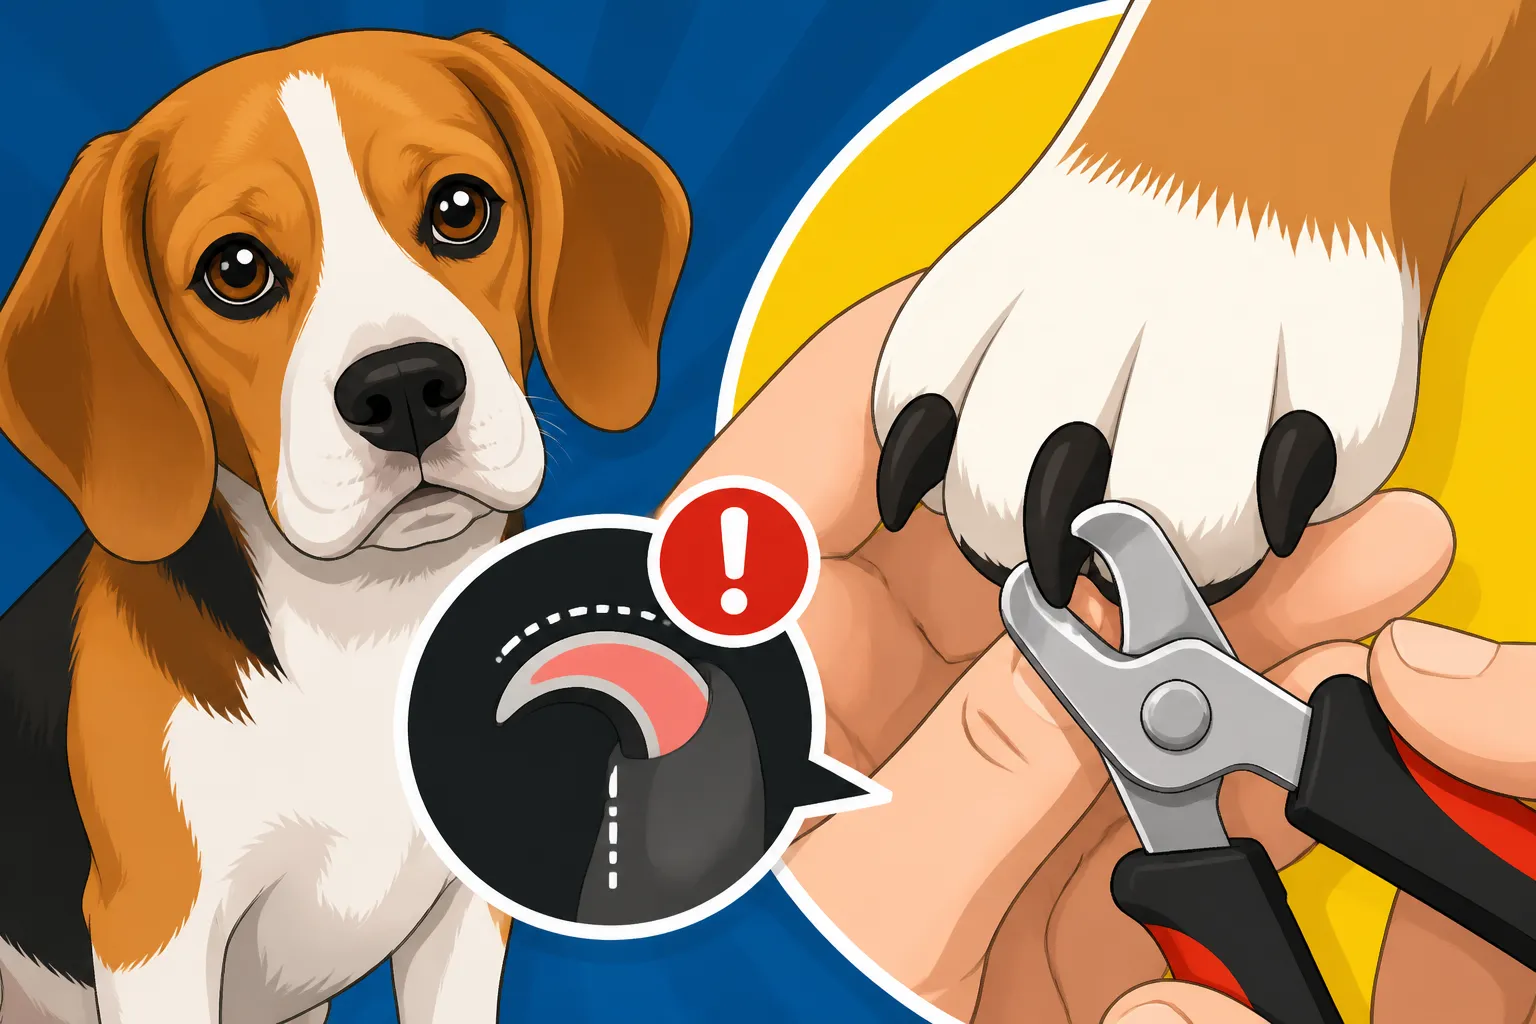
Before you even pick up a clipper, it's really helpful to understand what you're actually dealing with under that dark keratin. A dog's nail isn't just a dead piece of horn; it's a living structure, much like our own fingernails, but with a crucial difference: the quick. The quick is a soft core inside the nail that contains blood vessels and nerve endings. If you cut into the quick, it's painful for your Beagle and can cause bleeding. For dogs with light-colored nails, this quick appears as a pinkish area, making it relatively easy to avoid. For Beagles with black nails, however, that quick is completely hidden from view.
This invisible quick is the root of almost all the apprehension owners feel. You can't see where the safe zone ends and the danger zone begins. It feels like you're operating blind, and the last thing any loving pet parent wants is to hurt their furry family member. Plus, Beagles, with their active, scent-driven lives, can sometimes wear their nails down naturally if they're on rough terrain often. But for many, especially those enjoying more domestic lives, regular trimming is non-negotiable for their comfort and long-term joint health. Long nails can force their toes up, putting pressure on their joints and even leading to issues like Beagle Hip Dysplasia and Everyday Joint Wear or Beagle Arthritis Arriving in Middle Age.
The Hidden Quick and Its Implications
Imagine trying to cut a black pipe with a wire running through it, but you have no idea where that wire is. That's essentially what it feels like with black nails. The quick actually grows along with the nail, extending further down if the nails are allowed to get too long. This creates a vicious cycle: long nails mean a long quick, which means you can't cut much off without hitting it, and so the nails stay long. Our goal in regular trimming is not just to shorten the nail, but to encourage the quick to recede over time.
Because the quick is hidden, any misjudgment can result in a yelp, a bleed, and a very unhappy, distrustful Beagle. This can make future nail trimming sessions incredibly difficult, turning them into a struggle for both of you. Many Beagles aren't naturally thrilled with having their paws handled, so a bad experience can really set you back in your training efforts. It's why taking a slow, steady, and very cautious approach is absolutely vital when dealing with those dark nails.
Why Long Nails Are More Than Just an Aesthetic Problem
Beyond the immediate pain of a quicked nail, overgrown nails pose significant health risks for your Beagle. When a Beagle's nails are too long, they hit the ground before the paw pads do, pushing the toes upwards and backwards. This can put unnatural stress on the toe joints, leading to pain and potentially chronic arthritis over time. It's like walking in shoes that are too small and constantly stubbing your toes.
Long nails can also splinter, break, or even grow so long that they curl around and grow into the paw pad, causing excruciating pain and infection. This is particularly common with the dewclaws (the thumb-like claw on the inner side of the leg) which don't usually touch the ground and therefore don't wear down naturally. These issues can lead to your Beagle altering their gait to compensate, which in turn can affect their hips, spine, and overall mobility. Properly maintaining their nails is a small but critical part of Senior Beagle Care After the Age of Ten and ensuring their comfort throughout their lives.
Mastering the Art of Trimming Black Nails
Okay, so we know it's a challenge, but it's one you absolutely can master with the right tools, technique, and patience. The key to successfully trimming black nails is to approach it differently than you would light-colored nails. Forget trying to see a pink quick; instead, you're going to rely on a series of small, incremental cuts and looking for specific visual cues within the nail itself.
This isn't a race. It's a careful, deliberate process. Think of it as sculpting rather than chopping. If your Beagle is particularly sensitive about their paws, consider working on desensitization first, making paw handling a positive, treat-filled experience long before you bring out the clippers. Even if they're already fine with it, continue to pair nail trims with high-value rewards – something really special like a bit of cooked chicken or a taste of a favorite soft treat from a brand like Ollie can make all the difference.
Choosing the Right Tools for the Job
Having the proper equipment is half the battle. You wouldn't try to hammer a screw, and you shouldn't use dull, ineffective clippers on your Beagle's nails.
Here are the essential tools:
- Sharp, High-Quality Nail Clippers: There are two main types:
- Scissor-style clippers: These work like scissors and are often preferred for their precision. They typically have a safety guard, but for black nails, it's often best to push the guard out of the way so you have a clearer view of the small bits you're removing.
- Guillotine-style clippers: These have a small hole you insert the nail into, and a blade slides across to cut it. Some owners find these easier for quick snips.
- Regardless of style, sharpness is paramount. Dull clippers crush the nail rather than cutting it cleanly, which is painful for your dog and can cause the nail to splinter. You can find excellent, sharp clippers on Chewy or Amazon.
- Nail Grinder (Optional but Recommended): A Dremel-style rotary tool specifically designed for pet nails can be a game-changer for black nails. Instead of cutting, it grinds the nail down in tiny increments. This allows you to remove very small amounts at a time, making it much harder to quick your dog. It also smooths the nail, preventing sharp edges. The vibrating sensation and sound can be a hurdle for some Beagles, so gradual introduction and desensitization are key here.
- Styptic Powder (Essential): This is your emergency kit. Even the most careful trimmer can make a mistake. Styptic powder quickly stops bleeding if you accidentally cut the quick. Keep it within arm's reach every single time you trim nails. You can usually find a good supply when you buy clippers or on pet supply sites like Chewy.
The Micro-Clipping Technique
This is the golden rule for black nails. Instead of trying to take off a large section, you're going to take off tiny slivers, looking at the cross-section of the nail after each cut.
Here's a step-by-step approach:
- Positioning: Find a comfortable, well-lit spot. If your Beagle is prone to wiggling, having a helper to distract them with treats or hold them gently can be invaluable. Some Beagles do well standing, others prefer lying on their side.
- Pick up a Paw: Gently but firmly hold your Beagle's paw. Make sure to press on the paw pad just behind the nail to extend the nail forward and separate it from the fur.
- Make Tiny Snips: Take off just the very tip of the nail, a tiny sliver at a time. After each cut, look at the cross-section of the nail.
- Look for the "Bullseye": As you trim, you'll see the outer ring of the nail, which will be dark (black or gray). As you get closer to the quick, a lighter, often gray or white, oval shape will appear in the center of the dark ring. This is the beginning of the quick.
- Stop When You See the Dot: Continue taking tiny snips. Eventually, within that lighter oval, you'll see a small, darker black dot appear right in the center. This is the very beginning of the quick. STOP HERE. You are as close as you can safely get without causing pain or bleeding. The quick usually looks like a dark, waxy or moist circle surrounded by the lighter gray.
- Repeat for Each Nail: Move on to the next nail, following the same micro-clipping and visual cue process. Don't forget the dewclaws!
- Reward, Reward, Reward: After each nail, or even every couple of nails if your Beagle is patient, offer praise and a high-value treat. Make it a positive experience! This is crucial for building a good association with nail trims. The Treats a Beagle Will Work Hardest For are your best friend here.
If using a grinder, the principle is similar: grind for a few seconds, check the tip, and look for the bullseye. The friction from the grinder will also create a tiny bit of white dust around the quick as you get close, another subtle cue.
| Tool Type | Pros | Cons | Best For |
|---|---|---|---|
| Nail Clippers | Quick and efficient for cooperative dogs; gives a clean cut. | Higher risk of quicking on black nails; can leave sharp edges. | Dogs accustomed to clipping; experienced owners comfortable with black nails. |
| Nail Grinder | Safer for black nails (less risk of quicking); smooths edges. | Noise and vibration can scare some dogs; takes longer per nail. | Nervous dogs; owners who want maximum safety for black nails; quick recession. |
Making Nail Trimming a Positive Experience
No one wants nail trims to be a wrestling match. For a breed as sensitive and intelligent as a Beagle, positive reinforcement is your most powerful tool. The goal isn't just to get the nails trimmed; it's to make your Beagle willing and comfortable with the process. This takes patience, consistency, and a whole lot of delicious treats.
It's common for Beagles to be wary of paw handling. After all, their paws are how they experience the world of scent, and they might be protecting a sensitive area. A negative experience early on, like an accidental quicking or an overly forceful handler, can create a lasting aversion. This is why a slow, systematic desensitization process, coupled with generous rewards, is essential to turn what could be a stressful chore into a manageable routine, or even something your Beagle tolerates for the sake of a tasty reward.
Desensitization and Counter-Conditioning
If your Beagle is already wary or outright hates nail trims, you need to go back to basics. This isn't about rushing; it's about rebuilding trust and changing their emotional response.
Here's how to approach it:
- Start Small: Begin by just touching your Beagle's paw gently. Don't even think about clippers yet. Touch, praise, treat. Repeat this many times a day for a few days.
- Increase Duration: Gradually increase the length of time you hold their paw. Touch each toe. Still, just praise and treat.
- Introduce the Tools: Bring out the clippers or grinder. Don't use them yet. Just let your Beagle see them, smell them. Lay them on the ground near the treats. Every time the clippers are present, good things happen (treats!).
- Sound Association (for grinders): If using a grinder, turn it on away from your Beagle at first. Let them hear the sound, then immediately give a treat. Gradually bring the running grinder closer, always pairing with treats. Don't touch them with it yet.
- Touch with Tools (No Cut): Gently touch the clippers (closed) or the non-running grinder to your Beagle's paw. Praise and treat.
- Simulated Clip/Grind: Gently hold a nail as if you're going to clip, but don't cut. Or briefly touch the running grinder to your own fingernail (safely!) so they see it's not scary, then immediately treat them.
- The First Tiny Snip/Grind: When your Beagle is truly comfortable, take one tiny snip from one nail, or grind for just a second. Immediately follow with a jackpot of treats and enthusiastic praise. Then stop. Don't push it. You want to end on a positive note.
- Gradual Progression: Over several sessions, slowly increase the number of nails you trim, always watching your Beagle's body language for signs of stress. Never force it. If they pull away, go back a step.
Consistency is vital. Doing short, positive sessions frequently is far better than one long, stressful session once a month. Remember, patience is a virtue, especially with a Beagle's sometimes independent spirit. You might find some great calming aids or specialized treats on Chewy that can help with these training sessions. You can also explore advice on Crate Training a Beagle Bred to Sleep in a Pack if using a crate helps your Beagle feel secure during these sessions.
Positive Reinforcement is Key
Beagles are incredibly food-motivated. Use this to your advantage! Every step of the nail trimming process should be associated with something positive.
- High-Value Treats: Forget the everyday kibble. Bring out the good stuff! Small pieces of cheese, cooked meat, peanut butter (xylitol-free!), or special training treats. Brands like Ollie offer high-quality, palatable options that can be excellent for this.
- Praise and Affection: Use a happy, encouraging voice. Tell your Beagle how good they are. Gentle strokes and rubs in their favorite spots can also be a reward.
- Keep it Short and Sweet: If your Beagle only tolerates one nail per session, that's fine! Do one nail, shower them with praise and treats, and finish. You can do another nail later that day, or the next day. The goal is to build positive associations, not to get all nails done in one go if it causes stress.
- Consistency: Try to establish a regular routine. Every week, or every few days, even if you're just doing a quick check and touching their paws without actually trimming. This helps normalize the activity.
Dealing with the Inevitable: When You Quick Your Beagle
Despite all precautions, it happens. You cut too far, and your Beagle yelps, pulls away, and starts bleeding. It's upsetting for everyone involved, but knowing exactly what to do can help you manage the situation calmly and prevent it from becoming a traumatic experience. Don't panic; your calm demeanor will help your Beagle recover quicker.
It's natural to feel terrible when you quick your dog. It's a mistake we all try to avoid. But a quicked nail, while painful and messy, is usually not a serious emergency. The key is to stop the bleeding promptly and not let your own distress transfer to your Beagle. A casual, "Oops, minor boo-boo, let's fix it!" attitude is much better than a panicked reaction.
Immediate First Aid for a Quicked Nail
The moment you quick your Beagle, here's your action plan:
- Stay Calm: Your Beagle will pick up on your stress. Take a deep breath.
- Apply Styptic Powder: Immediately grab your styptic powder. Take a pinch of powder and firmly press it onto the bleeding tip of the nail. You may need to hold it there with gentle pressure for 15-30 seconds. The powder works by constricting the blood vessels and forming a clot.
- Cornstarch/Flour (If No Styptic Powder): If you don't have styptic powder on hand (though you really should!), cornstarch or flour can work in a pinch. Apply it in the same way, pressing firmly onto the bleeding nail. It's less effective than styptic powder but can help.
- Observe: Once the bleeding has stopped, keep an eye on the nail for a few minutes to ensure it doesn't start again.
- Offer Comfort and Rewards: After the ordeal, give your Beagle lots of praise, gentle reassurance, and perhaps a special treat, even if they were upset. You want to end on as positive a note as possible. Don't punish them for reacting to pain.
- Avoid Walking on Rough Surfaces: For the rest of the day, try to keep your Beagle from running on rough surfaces that might irritate the quicked nail.
Preventing Future Accidents and Anxiety
A quicking incident can set back your nail trimming progress significantly. It's crucial to minimize the chance of it happening again and to rebuild trust if it does.
- Trim More Frequently, Less at a Time: This is the absolute best way to prevent quicking. If you're trimming every week or every few days, you're only taking off the tiniest bit of nail growth, which keeps the quick shorter and reduces the risk. This regular maintenance helps the quick recede over time, making future trims even safer.
- Use the Micro-Clipping Technique Religiously: Even if you're feeling confident, stick to those tiny snips and always check the cross-section.
- Invest in a Grinder: As mentioned, a nail grinder significantly reduces the risk of quicking because it removes material slowly. If your Beagle tolerates it, it's a fantastic investment, especially for black nails. You can find many options on Amazon or Chewy.
- Focus on Positive Reinforcement: After a quick, go back to desensitization. Pair the sight of clippers, paw handling, and eventually tiny snips with massive rewards. You might need to make extra efforts to regain their confidence.
- Don't Overdo It After an Incident: If you quick your Beagle, it's probably best to stop the session right there, especially if they are very upset. Pick it up another day, perhaps just doing one nail, with extra treats and patience. Pushing through will only make them more resistant.
- Consult Your Vet or a Professional Groomer: If you're really struggling with fear or your Beagle is extremely resistant, don't hesitate to seek professional help. Your vet or a certified professional groomer can demonstrate the correct technique, give you tips tailored to your Beagle, or even do the trims for you until you feel more confident. They can also offer advice on Beagle Paw Care After a Field Walk or other related issues.
- Remember the Importance of Paw Health: While it's stressful, remembering why you're doing this helps. Healthy nails are vital for your Beagle's comfort, mobility, and overall quality of life. Think of it as a small, essential discomfort to prevent larger problems down the road. If the quicking is severe or you notice signs of infection later, consult your vet immediately, especially considering Beagle Emergency Signs That Cannot Wait Until Morning.
Trimming black beagle nails might always have a slight edge of caution, but by understanding the anatomy, using the right techniques, prioritizing positive experiences, and being prepared for minor mishaps, you can turn a daunting task into a manageable part of your Beagle's routine.
Disclaimer
This article is for general informational purposes only and does not constitute professional advice. Laws, prices and regulations vary by location and change over time. Consult a qualified professional for guidance on your specific situation.